Best workbench plans - Childrens Workbench Plans

| 0 komentar |
Best workbench plans

Best workbench plans


One evening a friend of my daughters was talking about some workbench plans he had percolating in his head. He asked if I could get him a few pieces of scrap wood from work. However, as we discussed his ideas for how to build a workbench, I realized that this would be a great project to develop for Totally Free Woodworking Plans.


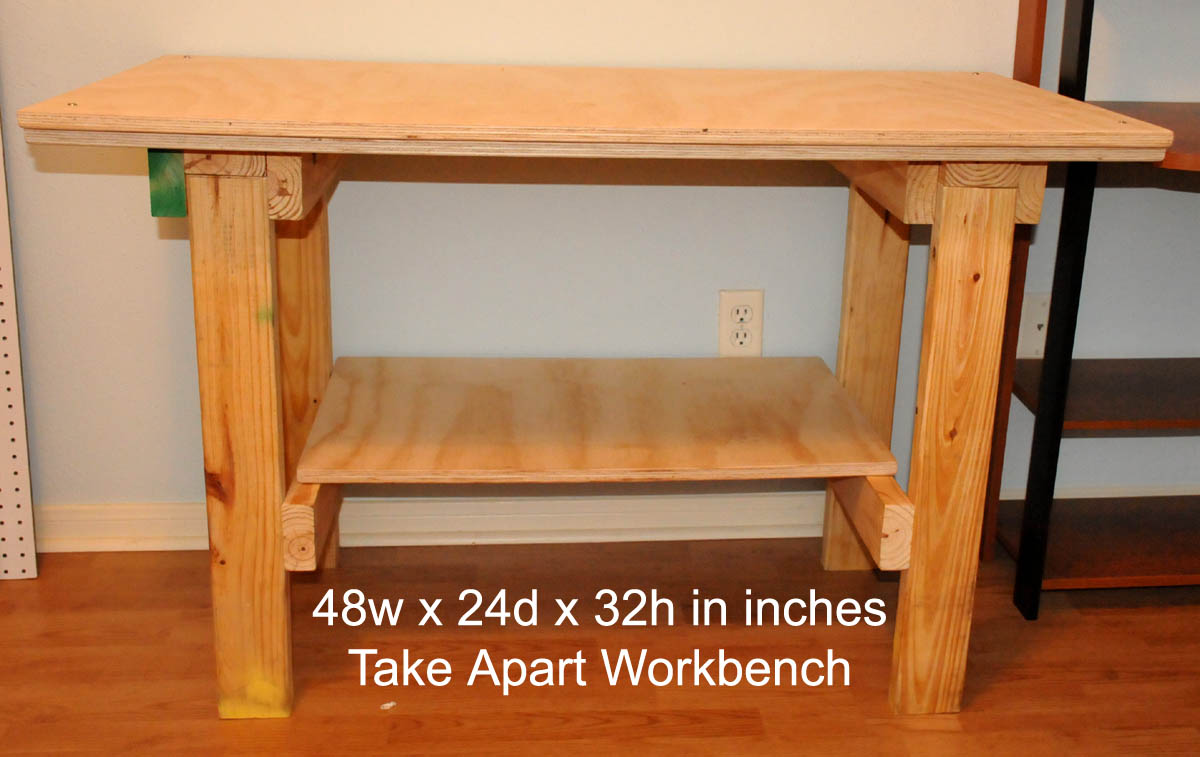
His idea was to build a workbench that actually doubled as a giant toolbox. The storage tray beneath the top, the hinged door, and the a-frame style legs were his idea. I refined the dimensions a bit and added the peg holes for hanging tools. What you see here are childrens workbench plans that came straight from the mind of a kid!

The funny part about this being a childrens workbench is that it would really work great as an adults workbench too. The 32" height is too short for my comfort, but increasing the height would be a pretty simple matter. Im 6 feet tall but someone shorter may find it comfortable to work at a 32" high workbench. So dont be scared away from building it just because it was designed with kids in mind.

Material Since the whole discussion of these workbench plans began as a request for scrap wood, my first inclination was to build it out of 3/4" melamine. By now you probably know how much I love the stuff, but the real motivation was the fact that we have tons of scrap 3/4" melamine at work. The problem with using melamine started to become apparent when I discovered that my son and the inventors little brother also wanted to build the same workbench.


As I imagined three rough eight to ten-year-old boys pounding on their new workbenches, I realized that particle board simply wouldnt hold up. A couple of good smacks with a hammer and the corners of the workbench would be a mess. So 3/4" plywood was my choice due its durability. Any shop grade of plywood will work fine, or even AC plywood sheathing. I happened to find four leftover sheets of plywood that had been faced with plastic laminate, so the boys workbenches turned out pretty fancy when all was said and done.

Hardware There are a couple of simple pieces of hardware you will need to complete the workbench. The workbench plans show a piano (or continous) hinge for the door. This is my preference for durability, but a piano hinge is about three times the price of a pair of simple butt hinges. At the last minute (meaning the checkout line at the hardware store), I changed to butt hinges and they worked great. We used only two per door, but three would hold up better.


The other thing youll need is some sort of catch at the top of the door. We used a heavy duty magnetic touch-latch that only cost a couple of dollars. Another alternative would be to use a magnetic or roller catch with some sort of handle to pull the door open.

Cutting The Parts The only really complex pieces to cut are the legs. Once you lay out the lines for the angles, they can be cut with a circular saw, a jigsaw, or a table saw with an angle jig. I sort of cheated and cut all the parts on a CNC router at work. Which brings up a good point about all the holes that need to be drilled (I think there are about seven thousand of them).


The 1/4" holes arent completely necessary. I had a bunch of 1/4" dowel laying around and thought it would be cool to make a sort of peg board to hang tools on the outside of the workbench. The workbench plans show the peg holes on the outside of the bench, but a couple of the boys turned the back around so they could hang their tools on the inside of the tool storage tray.

I used a CNC machine to drill all the holes, but Im not too sure I would have drilled them all if I had to do it by hand. So drill as many as you think youll need, or dont drill any at all. They really are just an option.


The 3/16" thru holes arent really optional. Those are there for assembly with 1-5/8" wood screws. If you lay them out according to the drawings youll have a much easier time lining things up. So I encourage you to drill them, even if you opt not to drill the peg holes.

Assembly Start by attaching the front and the back to the bottom using glue and 1-5/8" wood screws. Next, using the section view in the workbench plans as a guide, mark the locations of the back, bottom, and front on the inside of both legs. Attach the legs to the back/front/bottom assembly using glue and screws.


Hinging the door is easiest if done while the top is off. Attach the hinges to the door first, then fasten the hinged door to the front. For mounting hinges I suggest that you use a Vix Bit. For those who arent familiar with Vix Bits, they are self-centering drill bits. The ingenious little tool makes drilling perfectly centered holes an absolute breeze.


Mounting the top is pretty straightforward. Just make sure it overhangs the legs evenly all around. Depending on what method you use for holding the door shut, you may want to attach the catch to the underside of the top before attaching the top to the legs. Thats what we did and it eliminated the need to crawl inside the tool compartment upside down to install catch hardware.

Drawing File With a bit of help from us dads, the boys did almost all of the assembly themselves. So whether you build one of these workbenches for your kids, with your kids, or even for yourself, be sure to check out the plans. Just click on the link below. If youd like to download a copy to your computer, right click then "save-as". Either way, youll need the Adobe reader to view the file.


View or Download "Workbench Plans"


Return from Workbench Plans
to Woodworking Projects For Kids

Click Here and Start WoodWorking

Do you find information about Best workbench plans are you looking for? If not, below may help you find more information about the Best workbench plans. Thank you for visiting, have a nice day.
Read More..

bird feeder plans - Why dont hummingbirds feed at my hummingbird feeder

| 0 komentar |
bird feeder plans

bird feeder plans


I live in southern california and bought the Bird feeder at home depot. lots of hummers are around but i dont see them feeding?


Answer -

Use 1 part sugar to 3 parts water for your feed. Anything with a stronger concoction of sugar can kill them. Do not use honey, ever. It is fatal. Your feed does NOT have to be red but most feeders have a red flower and that is all that is needed. Mine would not come to red feed, just the red flower.

Be patient. You may have to wait until the babies are flying. They are not so set in their ways so may try yours when the others are too crowded and busy. They usually go to the same feeders year after year.

Sometimes, it takes time for the birds to adjust to feeding at a new feeder, especially if the feeder is located in a busy area. Do you make your own food? If so, make sure it is sweet; the recipe I use is 1 part white granulated sugar to 4 parts water. If the feeder is in the direct sunlight and gets warm, the birds wont drink from it. Give it some time, then you should have lots of bird feeding!


Humming birds are very territorial and will remember from year to year where food is available. Sometimes it can take anywhere from a few days to a few weeks before the birds begin feeding from your feeder. It took a few months before the birds at my feeder were noticeably feeding. Just remember to change the food at least once a week if not more often and clean the feeder each time. A mold can build up on the inside that can make the birds very sick. Ive also noticed that if there are a lot of ants around the feeder the birds will not drink from it. I put an ant mote on mine to prevent the ants from getting into it. I have also noticed that some of the birds dont like the store bought red food, they prefer the solution I make from sugar and water 1/4 cup sugar to 1 cup of water. 


Do you find information about bird feeder plans are you looking for? If not, below may help you find more information about the bird feeder plans. Thank you for visiting, have a nice day.
Read More..

easy wood projects - Board Meetings 3

| 0 komentar |
easy wood projects

easy wood projects


Right Click to Download MP3
Dax is working with cypress and when he mills his boards, they start warping almost immediately.Will is making bridle joints out of cherry and finds that once the material is removed from the female part of the bridle joint, the ends start to close in a bit so that he can’t even do a dry fit. Jay is in the market for a new cyclone and needs some advice on the Clear Vue as well as metal ductwork.

If you would like to participate in a Board Meeting, you’ll need to sign up for the Wood Whisperer Guild. We’d be glad to have you!


Click Here and Start WoodWorking


Do you find information about easy wood projects are you looking for? If not, below may help you find more information about the easy wood projects. Thank you for visiting, have a nice day.
Read More..

easy wood projects - Photo 366 32

| 0 komentar |
easy wood projects

easy wood projects


Summer feels like it is now rushing to an end.  As a family, it feels like we are really trying to pack in a lot now.  School starts in a few short weeks, Im not sure if any of us are ready for it or not, but Im not trying to worry about it now.

July 31 - Maben enjoying some watermelon, while taking a break from playing in the water.


August 1 - The only photos I took this day were of my current project over at So You Think Youre Crafty, so until the reveal, this is what you get to look at.  *Updated*  The only photos I took that day were product shots of my test tube vase.  I love it so much!


August 2 - Matt took Thursday and Friday off and we really celebrated Mabens birthday.  We hit up the Museum of Natural Science and Hermann Park.  This is a photo I got of us with my remote after we ate our picnic lunch.


August 3 - My baby is 5!  Today was his birthday and this is by far the most played with toy of the day.  He took over 200 photos today.


August 4 - My best friend and I headed down to Corpus Christi for the Antiques Roadshow (a post to come later all about that).  After we were done there, we went and toured the USS Lexington, an aircraft carrier from WWII.  It was so cool.


August 5 - Driving back to Houston from Corpus was rather interesting.  We had a large line of storms just seem to appear out of nowhere.  It looked rather nasty for a while.  Here is a photo of a funnel cloud that dissipated (thankfully).


August 6 - Maben and Colton rocking out to, "The Wheels on the Bus."


Do you find information about easy wood projects are you looking for? If not, below may help you find more information about the easy wood projects. Thank you for visiting, have a nice day.
Read More..

easy wood projects - How To Messy Line Drawings

| 0 komentar |
easy wood projects

easy wood projects


I love, Love, LOVE messy line drawings.  I have been working on perfecting my technique for this and have found such an EASY way to get this look and I will show you how.


First, with either a Cricut, Silhouette, Cuttlebug, etc...start with a die cut.  I have been working on trying to catch up in my scrapbooking and I needed a train, so thats what I used.  Aside from a die cut, you will also need a marker.  I used a 03 (which is approximately 0.35mm thick) prismacolor art pen.  I have done this with fine point sharpies too, but you would need a larger die cut since it creates a thicker line.


Look at your die cut and think about the shapes.  Everything can be broken down into shapes and lines.  Then start with one outline.


When you start drawing your shape/outline again, it doesnt have to be perfect.  The more imperfect it is, the better it looks. 

Keep repeating this same process all over your die cut and once you are done, you have a perfectly messy line drawing that you are going to love!


Do you find information about easy wood projects are you looking for? If not, below may help you find more information about the easy wood projects. Thank you for visiting, have a nice day.
Read More..

easy wood projects - A day at the duck races

| 0 komentar |
easy wood projects

easy wood projects


Sometimes I really do love Sussex and I was reminded of this last weekend when the boyfriend and I visited Storrington’s annual duck race. Where, as the title suggests, you pick a duck and then watch it race! The cute rubber ducks are £1 each to sponsor and are simply released into the river and left to race. It’s not exactly nail biting action, as they float pretty slowly (!) but was certainly a fun way to spend a sunny afternoon.


It’s held one Saturday every May in the library car park and there are car boot stalls, stalls from local shops, cakes, a bbq and live music. It’s not a massive event but has a lovely village atmosphere. All the proceeds from the duck races go to the local school, although there was a cash prize for the person who picked the winning duck (there were five heats and a final race) but sadly we didn’t get anywhere near!


Are there any quirky village events near you?

Do you find information about easy wood projects are you looking for? If not, below may help you find more information about the easy wood projects. Thank you for visiting, have a nice day.
Read More..

easy wood projects - Finished project a knitted teacup

| 0 komentar |
easy wood projects

easy wood projects


Time for tea?

Or perhaps a better question would be, why have I knitted a teacup?

Not a clue, its certainly not my most practical knit, but I think thats okay sometimes. Now that its finished Im not too keen on the fact its neon green. It seemed like a good idea at the time to use up the leftovers, but I think a slightly daintier colour would have worked better.

The pattern is from the fab craftseller magazine. The tea is just a needle felt circle, which isnt included in the craftseller pattern, but you cant have a teacup without tea - it didnt look finished without it!


So, milk and sugar?

Do you find information about easy wood projects are you looking for? If not, below may help you find more information about the easy wood projects. Thank you for visiting, have a nice day.
Read More..

easy wood projects - DIY Hat Rack

| 0 komentar |
easy wood projects

easy wood projects


When we enter into the Holiday Spiral, I realize that we have too much stuff and not enough organization.  My husband and I never grew up knowing how to organize too much as we moved a lot.  When you move a lot, you get to go through your things and throw out/donate/garage sale anything you dont want to move/forgot you had/or had no recollection of where it came from.  I have lived in over 20 different houses/apartments, so being in the same house for over 6 years, the clutter is starting to take over and I am on a mission to get rid of quite a bit and organize the areas that are driving me crazy.  Our front closet it one of them, which is why I made this.


I cant take credit for this idea.  My grandfather started making these probably before I was even born.  He had quite a few in his house and we had some growing up.  Why I havent made them before now, I cannot say, but feel like an idiot for not doing it sooner.  My husband and I both have quite a few hats we refuse to part with and most were all hanging out at the top of the hall closet.  They needed to be organized and not take up a lot of space.


You will need a board, the one I used was a 1/2x2x36, wooden clothes pins and wood glue.  Thats it.  I had all of these around the house so it made this project FREE!  Who doesnt love a free project that helps organize your house?

You will need to sand your board.  I sanded mine down to 120 grit.

Apply glue to the back of a clothes pin.


Press it onto your board making sure it is centered.


I was able to put 8 clothes pins on a 3 foot board.  My spacing was 1 1/2 inches at the top and bottom, then 1 inch between each clothes pin.

Let the glue dry, then screw this to the wall and you have an easy and very cheap (or free) way to calm the clutter of hats that couldnt have been living in just my closet...right?


Now I just need about 4 or 5 more of these.  Not kidding, we like our hats around here.


Do you find information about easy wood projects are you looking for? If not, below may help you find more information about the easy wood projects. Thank you for visiting, have a nice day.
Read More..

easy wood projects - Inspired by the rose

| 0 komentar |
easy wood projects

easy wood projects


This months inspired by is something which has now turned into an unlikely obsession of mine. A couple of weeks ago we brought ourselves a beautiful pale peach climbing rose to grow up the empty trellis on the back of our house, inspired by this trip to Pashley Manor. And in a move most unlike my normal self I have been diligently watering, training around the trellis and pruning it ever since - I was even out there yesterday morning before work! But its just such a beauty (and cost us a good £15 - who knew roses were so expensive?!) and currently has four roses and at least another three about to open so I wan to make sure they stay looking pretty for as long as possible. Ive also taken to cutting the ones which are hidden at the bottom and bringing them indoors to pop in little glass vases, really getting my moneys worth here. 

So heres my pick of a few more roses to adorn you and your home...


Crochet rose pattern | Skip to my Lou blog

Rose garden dress | Mrs Pomeranz | Not on the High Street 

Rose crown | Bloom by Ellen | Not on the High Street

Digital print | Laprintables | Etsy UK

And heres my beautiful rose...


Which is your favourite?


TWITTER | BLOGLOVIN | PINTEREST | INSTAGRAM | RSS


Do you find information about easy wood projects are you looking for? If not, below may help you find more information about the easy wood projects. Thank you for visiting, have a nice day.
Read More..

easy wood projects - How and why to use a pom pom maker

| 0 komentar |
easy wood projects

easy wood projects


Meet my new love... a pom-pom maker. I was a bit sceptical about these when they first appeared; I wasn’t sure how to use one or how you could better the cardboard circle pom-pom technique which had served me well since first school. Well, one very simple reason these new-fangled, technical looking plastic things are better than cardboard is SPEED! They are so quick to use, no cutting lots of lengths of wool and threading through a circle, you just open the arms slightly and wrap.


That is of course assuming you can understand the instructions on the back of the pack. ‘Open deyice’ and ‘will be wrapped in blue plastic part of the wool’ were just a couple of the hilarious directions that got lost in translation (one reason not to buy from Amazon, ahem).


Luckily the pictures were fairly straightforward and went something like this - open the arms on one side of the pom-pom maker. Wrap with wool and cut. Repeat with opposite arms.


Close the arms so your maker is back in a circle shape and cut through the middle of each half circle (like you would for the cardboard method).


Tie a piece of wool around the centre of the maker in the gap you have just cut. Tie tightly, pulling the pom-pom together.


Pull the two sides of the pom-pom maker apart to free your pom-pom and give it a final haircut if needed.


Needless to say I’m now slightly addicted to pom-pom making. So many craft ideas; watch this space. 

Do you find information about easy wood projects are you looking for? If not, below may help you find more information about the easy wood projects. Thank you for visiting, have a nice day.
Read More..

easy wood projects - Tough Going with Follow Me

| 0 komentar |
easy wood projects

easy wood projects


The Follow Me Tool has been one of the most reliable and effective tools in my design of furniture in SketchUp. After all, I like furniture with turnings and moldings so Follow Me has been frequently used with successful results. So I was surprised recently to run into some difficulty with the tool.
I ran into the problem while working on this Philadelphia Lowboy. The Top has a molded edge, but note the unique curved corners in the front.
Here is a close-up view of the front corner of the Top. I wasnt expecting any difficulty making this shaped edge, so it was quite a shock to see funny results with Follow Me. This set me back several hours as I began to experiment with alternative ways of using Follow Me. I knew that it could be done with a plug-in, but I was stuck on making Follow Me work.

The following are some of the steps I used to finally achieve an acceptable result.
Step 1: Here is a plan view of the Table Top corner along with the profile shape. Using the Arc Tool, I drew over the top of the shape shown with red edges and blue face. The angle at the corner is of course 45 degrees, so I placed an angled guideline with the Protractor.

Step 2: Expecting some difficulty with small facets, I scaled up the size of the corner shapes by a factor of 10. Then I placed the profile shape onto the flat shape as shown below. I selected the Follow Me Tool, clicked on the profile shape, and began to drag my mouse along the front edge.

Step 3: Here I am dragging the mouse along the front edge and watching the profile shape extrude the molding step-by-step. Of course, you can operate the Follow Me Tool differently by selecting the path, then clicking on the profile shape. But in this method, it is more difficult to see how Follow Me works and how the profile moves with respect to the path. Note that the profile always positions itself perpendicular to the path.

Step 4: Here Ive completed the Follow Me along the entire front edge across the corner. And you can readily see the problems at the corner. This is caused by the path turning in at the corner so that the profile rotates back on itself.


Step 5: Next I restarted the Follow Me, but this time I used the back edge as the path.

Step 6: Even though there were again problems at the corner, I could see a smooth and proper curved face through the corner. The extra edges were a result of face geometry created within the envelop of the molding shape. So I set out to edit and clean-up this area of the corner.

Step 7: I created a cutting plane at the 45 degree angle. Then I selected all geometry and executed Intersect Selected. After cleaning up with the Eraser, here are the results.

Step 8: Using the Push/Pull Tool, I extended the straight portions of the molded edge.

Step 9: I created one-half of the Top by closing in the top and bottom faces. Then I copied and flipped this half to make the whole Top piece.

I suspect there are easier ways to accomplish this difficult shaping (with Plug-ins), but now I know it can acceptably be done using Follow Me only.
Tim
Click Here and Start WoodWorking

Do you find information about easy wood projects are you looking for? If not, below may help you find more information about the easy wood projects. Thank you for visiting, have a nice day.
Read More..

woodworking table - Modern Susan Dining Table

| 0 komentar |
woodworking table

woodworking table


"Modern Susan" dining table on display at the Abernathy Arts Center in Sandy Springs, GA

Photo: Ken Schneiderman

A few weeks ago a friend of mine from Atlanta forwarded a photo of an interesting table he saw at an art show. I thought it was very cool and it reminded me of something that would come out of our "Furniture Lab" project we have going here at Fine Woodworking. Its made out of Baltic Birch plywood, glass, casted aluminum and neoprene. I contacted the builder, Seth Keaveny, and here is what he had to say about his inspiration for the piece:


"In this particular case I wanted to use a "found" or as you stated "non-


traditional" item(s) in the design while adding an element of mystery. The


goal was to design a dining table that the end user could interact with.


In the end, watching both adults and children alike spin the glass around 


and around with gigantic smiles on their face validated that my goal was 


indeed achieved. 


A lot of people were amazed that a central Z axis point was 


not included in the design. Through a little experimentation and a little


love from the world of physics, I was able to fabricate a functional dining table


without comprimising the integrity of the initial concept and design.


I am very proud of this piece and plan on designing a complete ensemble.


This includes a coffee table and end tables/night stands."


Click Here and Start WoodWorking


Do you find information about woodworking table are you looking for? If not, below may help you find more information about the woodworking table. Thank you for visiting, have a nice day.
Read More..

easy wood projects - Buying a home Top tips for once your offer is accepted

| 0 komentar |
easy wood projects

easy wood projects


There are lots of online guides offering help for what to do when your offer is accepted (nationwide has a good one here), so I wont go into detail on the actual process. Instead here are some top tips learned from experience, a few things that the various people involved might not tell you.


Use a local solicitor
For some reason (alright, theres probably a very good one) solicitors insist on posting a lot of documents, using a local solicitor will mean you can collect and drop things off when necessary and cut out postage times. They also have better local knowledge and often a good relationship with your estate agent which can help. It’s best to try and find someone who has been personally recommended – by a friend or relative, the ones recommended by either your mortgage company or estate agents might not be the best. Get quotes from at least two as well, to check they’re reasonably priced.

Dont start moving in emotionally
Sorry this is a bit of a depressing one, but until you actually exchange contracts there is still a lot that can go wrong. By all means celebrate your accepted offer, but I wouldnt recommend buying your paint. Its hard not to start planning and buying bits, especially when youre a first time buyer, but it makes it much worse if things go wrong (trust me on this!). Take it one step at a time.

Shop around for insurance quotes
Dont just take the home, contents and life insurance offered to you by your mortgage provider. Wed got to the point of being bamboozled by all the little costs associated when buying a house (lots of them, like particular searches and reports you have no choice over) so its easy to get stuck into saying yes just to keep the process moving. But set one evening and do some comparison quote searches for your insurances. Youll most likely find a better deal by going direct to a company rather than through your mortgage provider.

Id love to hear any more tips you might have, leave them in the comments. Up next – moving day and what not to do (learn from our mistakes!). Don’t forget you can also look back at three things I learned when searching for a house.


Do you find information about easy wood projects are you looking for? If not, below may help you find more information about the easy wood projects. Thank you for visiting, have a nice day.
Read More..

easy wood projects - Finally I have a motorized plane

| 0 komentar |
easy wood projects

easy wood projects


This is a hand plane? Not exactly. Its a Super Surfacer, which surfaces wood with a fixed blade, but on a much larger scale. And a motor drives a belt to feed wood through the blade rather than you feeding the blade over the wood.
Photo: Matt Kenney
When it comes to preparing a surface for finishing, nothing beats a hand plane. Its way faster than sanding and can leave a perfect, glass smooth surface. (And dont forget that hand planing is far more pleasant that sanding--no dust, no noise.) Thats why Ive heard over and over that theres no power tool thats the equal of a plane for surface prep. In a way thats true. There is no commonly available power tool thats up to the job, at least not here in the States. But in Japan, there is one. Its an odd machine thats looks to be the offspring of a drum sander and giant hand plane. Theyre commonly called super surfacers. How do they work? Well, there is a gigantic and extremely sharp fixed blade. A belt feeds a piece of wood past the blade and the blade takes a whispy full-width and full-length shaving. Thats right a full-width and full-length shaving off any board that fits into the machine! And like a plane it leaves a great surface.
Id seen one on video before, but had never seen one in person until last week. One of the editors at Fine Homebuilding is retiring and moving back to California. He was lightening his tool load and offered up a Hitachi FA-700 Super Surfacer to whoever would get it out of his garage. I jumped at the chance and now its in my garage. As you can see from the photos, it needs some cleaning and tuning, but it runs and I cant wait to see the first shaving come flying out the top. The blade is about 10 in. wide! Once I get it working properly, Ill shoot some video and post it. (Ill be the guy jumping around excited as a 5 year old.)
In the meantime, check out this YouTube video of a Super Surfacer at work.

On a side note, this machine and another one made by Makita were tested and reviewed in Fine Woodworking #38 by one of our former editors, Paul Bertorelli.

Click Here and Start WoodWorking

Do you find information about easy wood projects are you looking for? If not, below may help you find more information about the easy wood projects. Thank you for visiting, have a nice day.
Read More..

easy wood projects - Pillow fight!

| 0 komentar |
easy wood projects

easy wood projects


It was fairly early last Saturday afternoon when my Mum and I popped into the ladies room at the National Gallery in London, we’d just been to see Van Gough’s sunflowers (would definitely recommend) and were about to head out for a walk to St James park. In the loo we were both a bit perplexed by the two ladies picking what looked like white fluff off their clothes and hair - they were COVERED in it. But without wanting to ask what it was we simply left and made our way out onto the beautiful steps outside the Gallery, where suddenly it all became clear...


Pillow fight!

Yes, ladies and gentlemen the 5th of April is apparently International Pillow Fight Day and in celebration a flash mob descended on Trafalgar Square. It was so surreal; there was music, hundreds of pillow fighters and clouds of feathers in the sky (and on the ground, where they are much easier to photograph).


Oh, London.

Do you find information about easy wood projects are you looking for? If not, below may help you find more information about the easy wood projects. Thank you for visiting, have a nice day.
Read More..